Posted on Leave a comment

Create Your Own SVG for Christmas

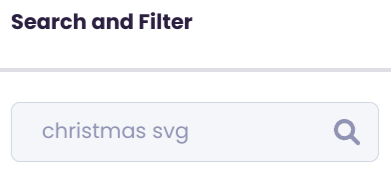
Want to create your own SVG for Christmas like this but don’t know where to start?

WATCH THE FREE CUSTOM CRICUT DESIGNS TRAINING to go deeper into my design framework

I’m Chaniece an SVG designer who helps crafters like you create your own SVG for Christmas crafts with a simple and easy-to-follow 5-step framework. In this post, I’ll guide you through a simple 5-step framework that will have you create your own SVG for Christmas in just minutes.

By the end of this post, you’ll have the confidence you need to get started creating your own SVG for Christmas crafts today.

Step 1: Pick a Theme – Ignite Your Vision

This is defining the overall mood and style you want to achieve for your design. Or specifically, who are you creating this design for?

A clear theme is the foundation — the most important part of the process, and provides a roadmap for your design, ensuring all elements are cohesive and communicate your desired message.

The theme you pick should create a sense of direction and spark your creative fire, igniting excitement and anticipation for the design process.

Here are some ideas of themes you can use:

  • Cozy Cabin Christmas: Imagine rustic snowflakes on woodgrain ornaments, twinkling fairy lights, and personalized stockings with initials.
  • Winter Wonderland Magic: Think glistening snowflakes, shimmering icicles, playful reindeer frolicking in snowy landscapes.
  • Whimsical Wonderland: Let your imagination run wild with gingerbread houses, dancing penguins, and adorable elves in candy cane stripes.

Envision your Christmas tree adorned with snowflakes cut from woodgrain-textured vinyl, cozy plaid ornaments with your family’s initials, and warm LED lights adding a charming glow.

Step 2: Pick Graphics – Let Visuals Speak

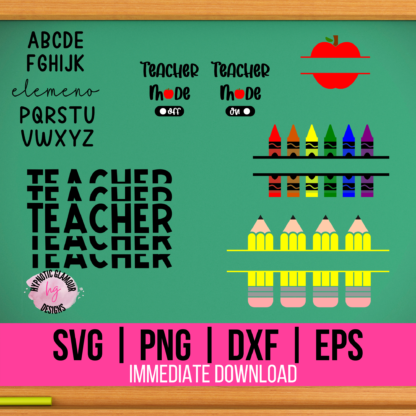
Select visually appealing graphics that complement your theme and add personality to your design. Imagine glittering snowflakes, whimsical reindeer, or a classic Santa silhouette.

Carefully chosen graphics enhance the visual appeal and message of your design, making it instantly recognizable and impactful. They open a world of creative possibilities, allowing you to experiment with different combinations and express your unique style.

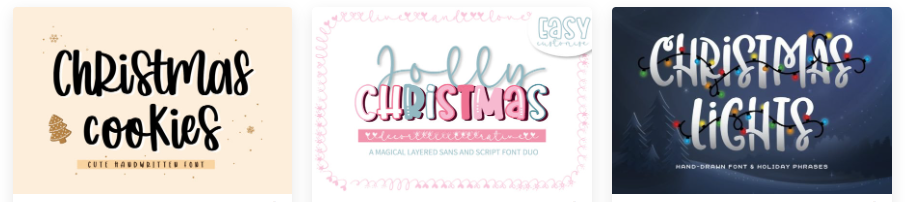
Here’s a quick way to find the exact graphics that you want for your project. Say for example, you want to use a snowflake, ornament, and Christmas tree in your design. You specifically want SVG files, so on a graphics site such as creativefabrica.com or in my shop, in the search bar you will put the graphic + the file type (separated by a space) to get the search term. See the example below.

Pro Tip: Don’t choose more than 3 graphics, so you don’t get decision fatigue or clutter your design.

Ideas of Christmas SVGs you can choose are:

  • Classic Elegance: Choose elegant serif fonts for crafts like timeless ornaments and gift tags.
  • Playful Charm: Opt for fun script fonts and adorable cartoon characters to bring whimsy to your decorations or gifts for family and friends.
  • Modern Chic: Experiment with geometric shapes, metallic accents, and bold graphic elements for a sleek and stylish look.

Picture yourself finding beautiful SVGs of snowflakes with delicate details and a playful reindeer with a Santa hat perched on its antlers, then download them and import them into Cricut Design Space with excitement.

Step 3: Pick Fonts – Let Words Dance

Choose fonts that complement your graphics and theme, adding a touch of personality and elegance to your design. Think playful script, bold serif, or whimsical hand-lettering.

Fonts help set the tone of your design and ensure readability, making your message clear and impactful.

Here’s some ideas:

  • Elegant and Serene: Choose serif fonts with delicate details for warmth and sophistication. Think flowing script for personalized messages and classic block fonts for bold headlines.
  • Playful and Fun: Embrace hand-drawn bubble fonts for a whimsical feel. Experiment with chunky block letters for a playful vibe and consider festive script fonts for personalized elements.
  • Modern and Stylish: Opt for sans-serif fonts with clean lines and geometric shapes for a contemporary look. Choose bold statement fonts for eye-catching designs and sleek script fonts for a touch of elegance.

Picking fonts gives you an opportunity to express your creativity through typography, fostering a sense of accomplishment and satisfaction with the design’s aesthetic.

Christmas Font Ideas

You’ve chosen a charming script font for your personalized ornaments and a classic serif font for her “Merry Christmas” banner. You’ve experimented with sizes and colors and found the perfect balance to complement your chosen graphics.

Step 4: Pick Colors – Let Emotions Flow

Select a color palette that evokes the desired emotions and complements your theme. Imagine warm reds and greens, cool blues and whites, or a mix of metallics and festive hues.

Colors play a powerful role in creating a mood and atmosphere, making your design emotionally resonant and visually appealing.

The colors you choose allow you to tap into your creativity and express yourself, leading to a sense of pride and satisfaction with the design’s emotional impact.

Colors you can choose include:

  • Warm and Cozy: Create a nostalgic Christmas atmosphere with rich reds, deep greens, and warm gold accents. Think twinkling fairy lights, gingerbread hues, and rustic wood textures.
  • Cool and Serene: Capture the magic of winter with icy blues, shimmering silvers, and crisp whites. Embrace snowflakes with frosty gradients, icicles with a sparkling touch, and soft winter landscapes.
  • Bold and Festive: Don’t be afraid to play with unexpected color combinations like vibrant pinks, turquoises, and lime greens for a fun and festive twist. Think candy cane stripes, playful polka dots, and metallic splashes for a dazzling effect.

Imagine that you’ve opted for warm reds and greens for your ornaments, evoking a cozy fireplace feel. You’ve chosen a touch of silver for the snowflakes and a bright gold for the reindeer’s hat, adding a festive sparkle.

Step 5: Pick a Phrase – Make it Personal!

Crafting a catchy and meaningful phrase that resonates with your theme and audience, adding a personalized touch to your design. Imagine “Merry & Bright,” “Home for the Holidays,” or a heartfelt message for loved ones.

Engaging phrases enhance the message of your design and make it more memorable, adding another layer of connection to your audience.

Custom phrases provide an opportunity to express your personality and creativity through words, leading to a sense of self-expression and satisfaction with your design’s personal touch.

You can use phrases like the following, depending on the goal of your project.

  • Heartfelt Greetings: Spread holiday cheer with classic messages like “Merry Christmas!” or “Happy Holidays!” Personalize with family names or inside jokes for an extra special touch.
  • Catchy and Creative: Craft playful phrases like “Jingle All the Way” or “Dashing Through the Snow” to add a touch of humor. Consider incorporating lyrics from your favorite Christmas carols for a musical twist.
  • Special Dates and Names: Incorporate birthdays or anniversaries into your designs for unique and meaningful gifts.

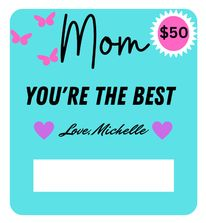
Picture personalizing your ornaments with each family member’s name and the year. She creates a banner that reads “Home for the Holidays, Love the [Family Name],” filling your heart with joy as you picture their delighted faces on Christmas morning.

Putting it all together

Now let’s put all this together to come up with our design concept.
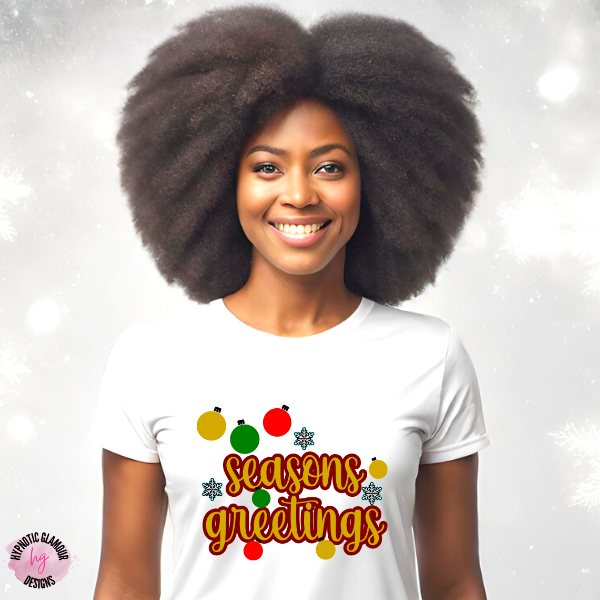
  1. Theme – Traditional
  2. Graphics – Ornaments and Snowflakes
  3. Font – Butter & Garlic
  4. Colors – Red, Green, and Gold
  5. Phrase – Seasons Greetings

Design with Confidence

By following these 5 steps, you’ll gain the skills and confidence to design stunning and unique Christmas SVGs that transform your holiday decorations and gifts into something truly magical. You’ll be able to:

  • Create personalized gifts that are truly unique and meaningful.
  • Design decorations that reflect your individual style and taste.
  • Express your creativity and bring joy to others during the holiday season.
  • Save money by crafting your own decorations and gifts.
  • Impress your friends and family with your artistic talents.

Bring your design to life

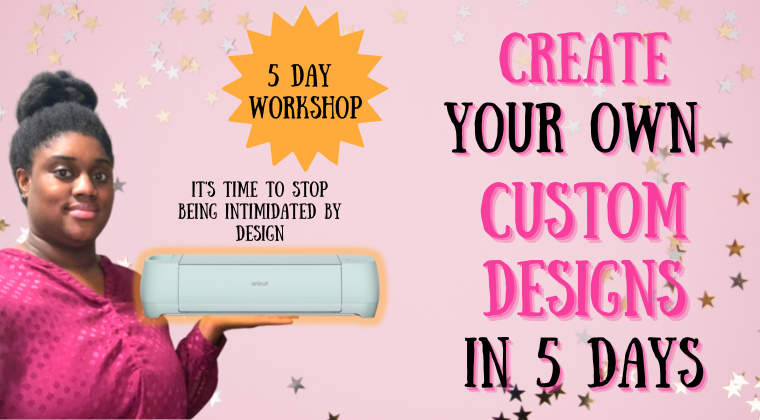
Ready to put together these elements and bring your design to life as you see below? Then enroll in my course “Create Your Own Design in 5 Days” where you’ll learn the essential tools needed to create custom designs, like this from scratch in Cricut Design Space.

Posted on Leave a comment

Christmas Money Card Holder Design Guide

Ready to design your own money card holders for Christmas but don’t know where to start?

Hi, I’m Chaniece from HGD, an SVG designer that helps crafters just like you create custom designs for their Christmas money card holders with a simple 4 step framework.

By the end of this blog post, you’ll transform from a creative crossroads to confidently brainstorming unique Christmas money card designs in just minutes. So, grab your pen and paper, and let’s get started on this joyful journey!

But before we dive in, don’t forget to snag your free Christmas SVG waiting for you below. It’s a little gift from me to give you an even faster shortcut and kickstart your holiday crafting spirit. Click below to get it now.

4 Step Framework

Step 1: Pick your graphics

Choosing the right graphics is like selecting ornaments for your Christmas tree. Think symbols of the season – a Christmas tree, an ornament, or a delicate snowflake. A few more examples of Christmas graphics you can use include: Santa Claus, reindeer, and Christmas trees.

These graphics lay the foundation for a design that resonates with the spirit of the holidays.

As you pick graphics, envision the joy they’ll bring to your recipients. Each graphic tells a story, adding a personal touch that warms hearts and creates lasting memories.

Many crafters, just like you, have transformed their designs with carefully chosen graphics.

Step 2: Pick your fonts

Fonts are the unsung heroes of design. Consider ‘Butter & Garlic‘ – a delightful choice reminiscent of handwritten holiday cards. Fonts add character and charm to your creation, enhancing the overall aesthetic.

Choosing the right font evokes nostalgia and warmth, turning a simple card into a cherished keepsake. It’s the detail that makes your creation uniquely yours. Also, take in mind your recipient when choosing your font. Script fonts give an more elegant touch while handwritten are more playful.

Crafters who’ve embraced ‘Butter & Garlic‘ rave about the personalized feel it adds to their designs. Join the chorus of satisfied creators!

Want to dive even deeper into this framework? Take my free masterclass below.

Step 3: Pick your colors

Dive into the Christmas color palette – red, green, and gold. These hues evoke the festive spirit, instantly transporting your creation into a winter wonderland. But you can also experiment with more unconventional color palettes to express unique style.

Colors set the mood and atmosphere. Picture the delight on your recipient’s face as they unwrap a money card holder adorned in festive shades – it’s the magic of the season captured in color.

Experimenting with different color combinations can help you to find a palette that matches your recipients personal preferences and the overall theme of the Christmas money card holder.

Step 4: Pick your phrase

Add a touch of sentiment with a seasonal greeting like “Season’s Greetings.” Your chosen phrase is the bow that ties your entire creation together, conveying warm wishes and spreading holiday cheer.

Phrases infuse your money card holder with emotion and help you to create a money card holder that is both meaningful and memorable. It’s a simple yet powerful way to communicate love, joy, and the spirit of giving. Here are some examples of other phrases you can use: “Merry Christmas,” or “Happy Holidays,”. You can also choose more personal phrases like “To my dearest family” or “With love from the Smiths.”

Choosing the right phrases can help you to express your feelings for the person you are giving the money card holder to. It can also help you to create a money card holder that will be cherished for years to come.

Practical exercise

Now, let’s put theory into practice! For my Christmas money card holder. Take a moment to select one graphic, one font, one set of colors, and one phrase for your Christmas money card holder.

Here’s what I came up with—

Overall, the four steps in this framework can help you create Christmas money card holders that are both stylish and meaningful. By choosing the right graphics, fonts, colors, and phrases, people can create card holders that will be cherished by the people you give them to.

Ready for more tips on creating Christmas money card holders? Dive into the video playlist below and let the crafting magic begin!

Posted on Leave a comment

The Font Selection Guide

Do you find it so difficult to find videos about the process for choosing fonts for your custom money card holders?

By the end of this video, you’ll be armed with the simple framework you need to pick a font for your money card holder design in minutes so you can focus on the crafting portion.

Click the button below to get the free font ideas guide and get an even faster shortcut to a curated list of fonts to use for your money card holder designs.

3 Step Font Selection Guide

Step 1: Pick Your Topic/Theme

The first crucial step in font selection is to determine the topic or theme of your money card holder project. This theme acts as the foundation upon which you’ll build your design.

Picking a clear theme provides a sense of direction and purpose to your project. It narrows down your font choices and helps you establish a coherent and visually appealing design. When you have a theme, it becomes easier for the recipient to connect to the money card holders, as they can instantly recognize and relate to the theme.

Crafters that create money card holders with clear themes tend to gain popularity with their money card holder designs and they tend to be appreciated by recipients for their clarity and theme-related aesthetics.

Here are some ways you can come up with a topic/theme for your money card holder:

  • Pick a holiday such as Halloween, Thanksgiving, or Christmas
  • Use a special occasion or event like weddings, baby showers, or graduations
  • Get inspired by a hot quote or trending meme.

Step 2: Create a Search Term

Creating a search term is like using a magic wand to uncover fonts that precisely match your chosen theme. It involves crafting a specific keyword phrase that includes your topic or theme along with the word “font.” Ex: Thanksgiving font

This step drastically simplifies your font search process. Instead of sifting through countless fonts, you’ll immediately find options tailored to your project’s theme. This efficiency reduces decision fatigue and streamlines your creative workflow, leaving you feeling more in control.

When crafters use search terms to pick a font, they save time and effort that would have otherwise been wasted on unrelated fonts.

A great place that I use and recommend to find fonts is CreativeFabrica.com

Step 3: Pick Your Font Style

Selecting the right font style is where the magic of conveying emotions happens. Depending on your project’s theme and the feelings you wish to evoke, you’ll choose a font style that aligns with your intentions. For instance, if you aim for playfulness, opt for handwritten fonts, while elegance is best expressed through script fonts.

Your font style communicates emotions and intentions to your recipient. Crafters who understand this leverage font styles to make their money card holders truly resonate with recipients. This step empowers you to create an emotional connection with those who receive your cards, leaving them feeling delighted and understood.

Crafters who choose the right font style elevate their money card holders to a new level of impact.

????Bonus Step: Use a font duo

Using a font duo is like having a secret weapon in your design arsenal. These duos are meticulously crafted by designers to complement each other perfectly. They eliminate the guesswork and time-consuming search for fonts that pair well together.

Font duos reduce the decision-making stress. When you use a font duo, you eliminate the uncertainty and time-consuming process of hunting for two fonts that harmonize. This streamlines your design workflow and boosts your confidence. Knowing that your fonts are designed to complement each other, you feel more in control of your project.

Crafters who use font duos discover the immense convenience they offer. They no longer struggle to find font combinations that work harmoniously. Instead, they enjoy the confidence of knowing that their font choices are expertly matched.

Which step in this font selection guide did you find most helpful? Put a 1,2, 3, or 4 in the comments.

  1. Pick a topic or theme
  2. Create a search term
  3. Pick your font style
  4. Use a font duo

Let’s put this all together

Now that you’ve learned the simple 3 step font selection guide. It’s time to put it into action.

  1. Pick a topic or theme – Thanksgiving
  2. Create a search term – Thanksgivng font
  3. Pick your font style – Playful

In the next post, we will be putting this all into action and creating our own quote designs for our money card holders in Cricut Design Space. Subscribe so you don’t miss it.

Click the button below to get the free font ideas guide and get an even faster shortcut to a curated list of fonts to use for your money card holder designs.


Download the free font ideas guide by clicking the pink button below.

Posted on Leave a comment

3 Secrets to Avoid Spending Hours Picking A Font

Want to make money card holders but you spend too much time picking the font?

By the end of this video, you’ll have 3 simple and easy-to-use strategies to be able to confidently pick a font in just minutes for your money card holder projects.

Get your free font ideas guide with a list of 10 curated fonts to give you an even faster shortcut to picking a font to use for your money card holder designs.

Mistakes:

Mistake 1: Not Using Font Duos

If you’re one of those crafters spending hours scouring the internet for that “perfect” font combination for your money card holder project, It’s a common mistake, but there’s a better way. Instead of looking through random fonts, consider using font duos. These are carefully paired font combinations that not only save you time but also add a professional touch to your designs.

By embracing font duos, you’ll feel a sense of relief. No more font-hunting frustration! You’ll experience confidence in your design choices, knowing that these duos are expertly matched to create stunning money card holders.

Thousands of crafters like you have discovered the magic of font duos. These duos have transformed their projects from ordinary to extraordinary. Join this community and witness the difference for yourself.

Mistake 2: Trying to Look for the Perfect Font

If you are on an endless quest for the “perfect” font, don’t worry. It’s a mistake many crafters make. Instead of seeking perfection, understand that there’s no one-size-fits-all font. Embrace the idea that each project has its unique charm and can have more than one choice for different occasions.

Letting go of the pursuit of perfection will free you from the stress of font selection. You’ll experience creativity without constraints, knowing that there’s beauty in diversity. Your money card holders will be more versatile and captivating.

Crafters who shifted their mindset from “perfect” to “suitable” fonts celebrate their newfound design freedom. This change leads to more unique and eye-catching money card holders. Join them in embracing font diversity.

Mistake 3: Not Having a Simple and Easy-to-Follow Formula

If the thought of choosing fonts for your money card holders overwhelms you, the key is having a straightforward formula to guide you through the process. Instead of aimlessly experimenting with fonts, use a simple, step-by-step formula. It will take the guesswork out of font selection, making your projects a breeze.

When you have a clear formula, you’ll experience a sense of control. You’ll no longer feel lost in the font jungle. Confidence will replace confusion as you follow the formula, knowing your money card holders will turn out beautifully.

Crafters who adopted this formula have reported remarkable transformations in their designs. They’ve shared their before-and-after pictures, highlighting how simplicity and clarity elevated their projects. Be part of this success story.

Don’t let font selection hold you back. Instead, use font duos, follow a simple formula, and let go of the quest for perfection. Crafters just like you have already reaped the rewards of these strategies, and you can too. Say goodbye to font frustration and hello to stunning money card holders!

Which one of these mistakes have you made? Put a 1, 2, or 3 in the comments.

Don’t miss next week’s video where we’ll dive into a simple 3 step framework that you can use to pick your fonts quickly and easily every time. Subscribe so you don’t miss it.

Download the free font ideas guide by clicking the link in the description or the pink button below this video.

Posted on Leave a comment

Halloween Card Ideas to Make in Cricut Design Space

Curious about designing money card holders for Halloween but not sure what’s possible?

By the end of this step-by-step guide, you’ll transition from uncertainty to confidence, discovering the endless Halloween card ideas you can bring to life using Cricut Design Space.

Get ready to dive into the world of creative Halloween money card holders by joining the upcoming Free Halloween Money Card Holder Workshop. It’s a collaborative crafting event where you’ll effortlessly assemble your designs based on what you learn in this tutorial.

Myth 1: You Need Fancy Tools for Graphic Design

Expensive tools aren’t a requirement for crafting stunning designs. You can work wonders with what you already have, bringing your custom money card holder ideas to life. Many successful designers prove that creativity isn’t determined by the tools you use. Take a look at this money card holder designed solely using Cricut Design Space by one of my students.

So what should you do instead? Start with what’s accessible. Your creative journey is about refining your skills, not just relying on tools. Surpassing this myth empowers you to unleash your creativity without limitations, focusing on expressing your ideas rather than the tools.

Myth 2: You Need to Be a Natural-Born Creative

Creativity is a skill anyone can develop. It’s not confined to a select few; everyone can grow and enhance their creative abilities. Just like any other skill, creativity can be nurtured through practice, learning, and exposure to diverse art forms. Meet June, a once-apprehensive student who found clarity and confidence in the instructions.

Embrace growth and start experimenting. A wealth of techniques and inspiration awaits. Dispelling this myth liberates you from self-doubt, unlocking your creative potential and the joy of artistic expression.

Myth 3: Graphic Design Is About Creating 100% Original Designs Every Time

Graphic design involves remixing and adapting existing elements to save time and foster innovation. Collaboration often sparks fresh ideas. Existing components can lead to remarkable results. Many design collections reuse or combine a handful of graphics in multiple ways, like just 3 graphics forming 7 unique designs. Embrace the power of repurposing. Combine elements to craft designs uniquely yours. Overcoming this myth relieves the pressure of reinventing the wheel. Focus on crafting impactful designs that resonate.

Which myth resonated with you? Share your thoughts in the comments.

Don’t miss out on our Free Halloween Money Card Holder Workshop! Click to secure your spot now.

Dive into the playlist below for more valuable tips to effortlessly create money card holders. Your Halloween designs are just a few clicks away!

Posted on Leave a comment

4 Steps to Design Creative Cash Gift Holders

creative money gift holders

Want to design a creative cash gift holder but don’t know where to start?

If you’ve ever wanted to create those special and unique cash holders that add a personal touch to your gifts, you’re in the right place.

By the end of this article, you’ll have the confidence to brainstorm a money card holder design in just minutes.

I understand how overwhelming it can be to create something from scratch, especially when it comes to crafting. But fear not! With this simple 4-step framework, you’ll be well on your way to designing your very own creative cash gift holders that are sure to impress.

Step 1: Pick Your Theme

The first step in creating captivating money card holders is to choose a theme or topic. Whether it’s for a baby shower, birthday celebration, wedding, a trendy meme, a favorite quote, or even based on the current season or holiday, your theme will set the foundation for your design. By aligning your creative efforts with a specific theme, you’ll not only give your project a purpose but also guide your design choices. Feeling excited and enthusiastic about your chosen theme will make the design process a breeze.

Step 2: Select Your Graphics

Fonts play a crucial role in the overall style and personality of your money card holder design. By selecting fonts that align with your theme, you ensure that the textual elements seamlessly blend with the graphics. The right font choice enhances your design’s message and evokes the intended emotions. Exploring different font options and finding the ones that truly enhance your design will boost your confidence in your design skills.

Step 3: Choose Your Fonts

Fonts play a crucial role in the overall style and personality of your money card holder design. By selecting fonts that align with your theme, you ensure that the textual elements seamlessly blend with the graphics. The right font choice enhances your design’s message and evokes the intended emotions. Exploring different font options and finding the ones that truly enhance your design will boost your confidence in your design skills.

Step 4: Decide Your Colors

Colors have the power to convey emotions and set the tone of your design. When selecting colors, consider the ones associated with your chosen theme. Create a color scheme that complements your theme and graphics, resulting in a harmonious visual experience. Experimenting with various color combinations will spark your creativity and help you discover the perfect palette that brings your design to life.

Which of these steps are you most excited to dive into? Let us know in the comments by assigning a number to each step (1-4).

In conclusion, this simple 4-step framework empowers crafters like you to create visually appealing and meaningful money card holders. By following these steps, you not only produce beautiful designs but also experience a range of positive emotions such as enthusiasm, accomplishment, satisfaction, and joy throughout your crafting journey.

Want more help with creative cash gift holders?

Want to take your skills to the next level, watch the free training on Money Card Holder Design. We’ll dive deeper into each of these steps, providing you with more insights and tips to enhance your creative process.

Stay tuned for the next post when we’ll explore money card holder design creation in Cricut Design Space. I’ll walk you through putting together the steps we discussed today and bring your unique design to life.

Ready to get started with money card holder creation? Click below to grab your free copy of the Money Card Holder Starter Guide and kickstart your creative journey.

If you’re eager to learn more and create stunning money card holders with ease, don’t forget to watch the playlist on your screen now with even more tips and tricks to help you master the art of crafting beautiful and creative money gift holders.

Posted on Leave a comment

Where to Start with Creating Unique Cash Gift Holders

unique cash gift holders

Are you ready to embark on the journey of crafting beautiful and unique cash gift holders, but not sure where to begin? Don’t worry, I’m here to guide you through the process and help you gain the confidence you need to create stunning money card holders that will leave a lasting impression.

By the time you finish reading this article, you’ll not only understand the common pitfalls to avoid but also discover empowering solutions that will set you on the path to crafting success. Imagine the satisfaction of creating personalized cash gift holders that showcase your creativity and bring joy to others.

To kickstart your crafting journey, I’m offering you a valuable resource – the Money Card Holder Starter Guide. This guide will provide you with essential tips, techniques, and insights to help you create remarkable cash gift holders that stand out

Mistake #1: Succumbing to Self-Doubt

Instead cultivate self-belief and positive affirmation so that you feel empowered, experience creative freedom, and achieve fulfillment.

When self-doubt creeps into your creative journey, it can cast a shadow. But don’t worry, because you possess the power to turn self-doubt into self-belief.

Instead of letting self-doubt hold you back, embrace positive affirmations. Remind yourself of your skills, talents, and the beauty you’re capable of creating. Surround yourself with supportive communities and mentors who uplift and encourage your creative spirit.

Imagine the excitement of starting each project with unwavering self-confidence. Your creations will exude newfound assurance and authenticity that captures attention and hearts. Embracing self-belief will free you from creative constraints and empower you to explore fearlessly.

By dispelling self-doubt and embracing self-belief, you’ll step into your role as a capable and innovative crafter. Your work will mirror your newfound confidence and resonate with a sense of fulfillment that arises from pursuing your creative passions wholeheartedly.

Mistake #2: Ignoring a Simplified and Duplicatable Process

Embrace efficiency and consistency so that you gain confidence, boost productivity, and enjoy creative freedom

Are you feeling overwhelmed by the complexity of your crafting process? It’s time to shift gears and explore the magic of simplicity and consistency.

Instead of approaching each money card holder as a separate challenge, try adopting a simplified and duplicatable process. Follow a step-by-step system that streamlines your work, making crafting a breeze. This not only saves time but also guarantees consistent, high-quality outcomes.

Imagine the comfort of having a proven process that guides you from idea to finished creation. With a simplified approach, you’ll discover a newfound confidence in your crafting skills. Plus, the extra time you save can be devoted to exploring your creative ideas, experimenting with designs, and adding your personal touch.

By embracing efficiency and consistency, you’ll escape overwhelm and gain the freedom to genuinely enjoy the crafting journey. Bid farewell to stress and say hello to a world of boundless creative possibilities!

Mistake #3: Avoiding Mistakes Instead of Embracing Them

Embrace imperfections as learning opportunities so that you foster growth, encourage innovation, and cultivate creative resilience

Here’s a secret: mistakes aren’t failures, but stepping stones to crafting greatness! Instead of fearing mistakes, let’s shift our perspective.

Welcome those unexpected outcomes as valuable learning experiences. Embrace the process of troubleshooting and problem-solving. This approach will fuel your creativity and innovation, leading to unique designs that stand out.

By embracing mistakes, you’re nurturing not only your crafting skills but also building emotional strength. Each imperfection becomes an opportunity to grow, adapt, and refine your craft. Your creations will evolve into genuine reflections of your journey, making them even more special and cherished. So, let’s embrace mistakes as allies on our path to becoming extraordinary crafters!

Have you made any of these crafting mistakes? Share your experiences in the comments below!

Stay tuned for next week’s article, where I’ll unveil a simple 4-step framework to design any money card holder in just minutes. Don’t miss out – click the button below to grab your free copy of the Money Card Holder Starter Guide.

Ready to take your crafting journey to the next level? Check out the playlist below for more tips and tricks to effortlessly create unique cash gift holders that will leave a lasting impression. Your creative adventure starts here!

Posted on Leave a comment

Ways to Edit an SVG in Cricut Design Space

Are you a Cricut crafter looking to add a personal touch to your projects? If you’ve ever wondered how to edit an SVG for your craft project, you’ve come to the right place!

In this blog post, we’ll explore three simple ways you can confidently edit an SVG for your Cricut crafts, allowing you to unleash your creativity in just minutes.

By the end of this article, you’ll have the knowledge and confidence to make the most of your SVG files. Let’s dive in and discover how you can effortlessly customize your designs to create stunning and unique craft projects.

edit an svg

3 Things You Need to Edit an SVG

The right file type

  1. One of the key elements to successfully edit an SVG is using the right file type. It’s important to note that you cannot edit raster images like PNG or JPG files directly in Cricut Design Space. By ensuring you have the correct SVG file, you guarantee compatibility and smooth integration with the software.

This simple step provides you with a sense of security, as you can trust that your designs will seamlessly translate into Cricut Design Space. No more troubleshooting compatibility issues—instead, you can focus wholeheartedly on your creative expression and bring your craft visions to life.

The right layer

  1. Once you have the correct file type, the next crucial step is selecting the right layer within your SVG file. This allows you to edit specific elements of the design without unintentionally altering other parts. By mastering this skill, you gain confidence and satisfaction in having complete control over individual elements within your SVG designs.

Say goodbye to inhibitions and hello to personalized expression! Selecting the right layer empowers you to fine-tune your designs, adjust colors, tweak shapes, or add text with precision. The attention to detail you can achieve enhances the quality and visual appeal of your finished projects.

The right tools

  1. Equipped with the correct file type and the ability to select the right layer, it’s time to unleash the power of the right tools in Cricut Design Space. These tools are designed to make your editing process seamless and efficient. Once you understand how to use them effectively, you’ll experience a surge of joy and excitement as you effortlessly manipulate your SVG files.

Resizing, rotating, mirroring, welding—these are just a few of the incredible features at your disposal. With the right tools, you have limitless possibilities to transform and customize your designs. Embrace the freedom to experiment, explore different techniques, and create truly unique and captivating projects that reflect your artistic vision.

Which of these challenges have you encountered while editing SVG files? Share your experiences in the comments below—I’d love to hear from you and offer any additional guidance you may need.

In the next post, we’ll delve into the four components of a successful craft journey. Don’t miss out! Click the button below to join the design squad (and get a Free SVGs) to stay informed.

If you’re ready to find ready-to-cut designs in just minutes, check out the playlist below now. We’ve prepared a simple checklist to streamline your search process and help you discover the perfect designs for your Cricut crafts.

Editing an SVG for your Cricut crafts doesn’t have to be daunting. With the right file type, the ability to select the right layer, and utilizing the right tools, you can confidently customize your designs and bring your creative ideas to life. Embrace the joy of crafting and explore the endless possibilities that await you. Happy crafting!

Posted on Leave a comment

5-Step Framework to Create Your Own Juneteenth Graphic Design

Want to create your own Juneteenth Graphic Designs SVG like this but don’t know where to get started?

Juneteenth DIY crafts

Hi, I’m Chaniece, an SVG designer dedicated to helping crafters like you unleash their creativity and design custom SVGs, even if you’re unsure where to begin. In this post, I’ll guide you through a simple 5-step framework that will have you brainstorm your Juneteenth graphic design in just minutes.

By the end of this post, you’ll feel empowered to create personalized and meaningful Juneteenth graphic designs that capture the essence of this important holiday. Unlock your creative potential and let your imagination soar as we delve into the world of SVG design.

Step 1: Pick a Topic or Theme

Start by choosing a topic or theme that resonates with Juneteenth. Draw inspiration from historical events, symbols of freedom, or elements that represent African American heritage. Reflect on the significance of Juneteenth and let it guide your design direction.

Step 2: Pick Graphics

Select graphics that visually communicate the essence of Juneteenth. Consider incorporating symbols like doves, broken chains, or images that represent freedom and progress. Browse through Juneteenth-related resources and adapt them to your design or create your own original graphics.

Step 3: Pick Fonts

Choose fonts that complement the theme and tone of your Juneteenth design. Explore elegant scripts, bold serifs, or clean sans-serifs. Aim for legibility and ensure the fonts enhance the overall message and aesthetics of your design.

Step 4: Pick Colors

Delve into a color palette that evokes the spirit of Juneteenth. Consider hues like red, black, green, and gold. Red symbolizes strength and resilience, black represents heritage and unity, green signifies growth and hope, while gold represents achievement and prosperity. Experiment with different combinations to find the perfect balance.

Step 5: Pick a Phrase

Select a phrase that encapsulates the essence of Juneteenth. It could be a powerful quote, a rallying call for freedom, or a message of unity and equality. Let the words convey the historical significance of Juneteenth.

Congratulations! You’ve just uncovered a 5-step framework to create your own Juneteenth graphic designs. I can’t wait to see what you come up with!

Share your design ideas in the comments below and let’s celebrate our collective creativity.

Click the button below to gain access to the free Custom Cricut Design Space training. Elevate your crafting skills and bring your Juneteenth graphic designs to life with confidence. Sign up now and create, inspire, and celebrate the power of Juneteenth through design!

Posted on Leave a comment

How to Make a Money Gift Card Holder for Father’s Day

Are you looking for a heartfelt and personalized gift idea for Father’s Day?

Father’s Day is the perfect occasion to show the special dads in your life how much you care. In this step-by-step guide, I’ll walk you through the process of creating your own homemade money card holder. With just a few materials and some creativity, you’ll have a unique and meaningful gift ready to impress. Let’s get started!

Step 1: Get the Money Card Holder Starter Guide

To begin, download your free copy of the Money Card Holder Starter Guide. This guide will provide you with all the materials you need to get started.

Step 2: Use Design Frameworks

Now it’s time to unleash your creativity! Select the graphics, fonts, and colors that best represent the dad’s personality and interests. Personalize the design to make it truly unique and meaningful.

If you have trouble with this step, check out my free money card holder training that breaks down all of these frameworks and shows you how to pick each of these in just minutes.

A. Pick Your Graphics: Choose images or illustrations that reflect the dad’s hobbies, passions, or favorite symbols. Consider using Father’s Day-themed elements to add an extra touch of celebration. You can find these for free in the Free SVG library.

B. Pick Your Fonts: Select fonts that complement the overall design and convey the desired message. Opt for a combination of fonts (also known as font duos) to add visual interest and ensure readability. Click below to get some examples of fonts you can use.

C. Pick Your Colors: Use a color scheme that resonates with dad’s preferences or matches the theme of the homemade money gift card holder. Consider incorporating shades that evoke warmth and appreciation.

Step 3: Create Your Design in Cricut Design Space

Transfer your chosen design elements to Cricut Design Space, a user-friendly software that allows you to bring your ideas to life. Upload the graphics, customize the text, and arrange everything according to your desired layout.

Step 4: Flatten Design

Once you’re satisfied with the design, ensure all elements are properly aligned and grouped together. Flatten the design for the print then cut process.

Step 5: Print then Cut Money Card Holder

Load your cardstock (preferably 110 lb) into your printer and print the flattened design. Make sure the print quality is set to high and the bleed is turned on for optimal results. Once printed, load the printed cardstock onto your cutting machine and let it work its magic. Watch as your design comes to life with precision and detail.

Step 6: Assemble and Attach Lip Balm Box to Card

Download the free lip balm box SVG to hold the money. Upload the file to Cricut Design Space and follow the instructions in the instructional video to format the file before cutting. Then, cut out the box. Now, attach the lip balm box SVG to the front of the homemade money card holderin the designated spot using glue. This will provide a unique and functional display for the money.

Step 7: Add Money to the Lip Balm Box and Seal

Finally, insert the desired amount of money into the lip balm box attached to the homemade money card holder. Seal the box to ensure the bills are securely held in place. Consider adding a heartfelt note or a personal message to the message box in the upper left of the card to complete the Father’s Day surprise.

Congratulations! You’ve successfully created a homemade money card holder for Father’s Day. This heartfelt and practical gift will surely bring a smile to any dad’s face. Remember, the joy is not only in the final product but also in the thought and effort you put into creating something unique and meaningful. Get creative, have fun, and enjoy the satisfaction of giving a handmade gift from the heart. Happy crafting and Happy Father’s Day!